Core Graphic是iOS中一套基于C的框架,用于一切绘图操作,UIKit就是基于Core Graphic实现的,因此它可以实现比UIKit更底层的功能。
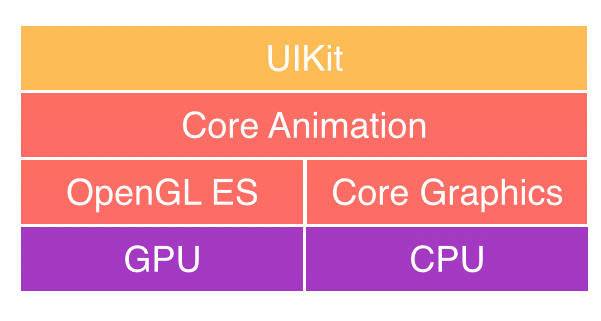
根据苹果的描述,UIKit是我们最容易也是最常接触到的框架。绝大多数图形界面都由UIKit完成。但是UIKit依赖于Core Graphics框架,也是基于Core Graphics框架实现的。如果想要完成某些更底层的功能或者追求极致的性能,那么依然推荐使用Core Graphics完成。
在使用Core Graphics进行绘图时,需要注意以下几点:
- Core Graphics其实是一套基于C的API框架,使用了Quartz作为绘图引擎。这也就意味着Core Graphics不是面向对象的。
- Core Graphics需要一个图形上下文(Context)。所谓的图形上下文(Context),说白了就是一张画布。这一点非常容易理解,Core Graphics提供了一系列绘图API,自然需要指定在哪里画图。因此很多API都需要一个上下文(Context)参数。
- Core Graphics的图形上下文(Context)是堆栈式的。只能在栈顶的上下文(画布)上画图。
- Core Graphics中有一些API,名称不同却有着相似的功能,新手只需要掌握一种,并能够看懂其他的即可。
Core Graphics的基本使用
使用 Core Graphics 进行绘图可以总结为一下几个步骤:
- 获取上下文(画布)
创建路径(自定义或者调用系统的API)并添加到上下文中。
- 进行绘图内容的设置(画笔颜色、粗细、填充区域颜色、阴影、连接点形状等)
- 开始绘图(CGContextDrawPath)
- 释放路径(CGPathRelease)
为了使用Core Graphics来绘图,最简单的方法就是自定义一个类继承自UIView,并重写子类的drawRect方法。在这个方法中绘制图形。
1
2
3
4
5
6
7
8
9
10
11
12
13
14
15
| - (void)drawRect:(CGRect)rect {
// 1. 获取图形上下文
CGContextRef ctx = UIGraphicsGetCurrentContext();
// 2. 创建路径
float radius = MIN(self.bounds.size.width, self.bounds.size.height) * 0.5 - 4;
CGContextAddArc(ctx, self.frame.size.width/2, self.frame.size.height/2, radius, 0, M_PI*2, 1);
// 3. 设置绘制参数
CGContextSetLineWidth(ctx, 4);
CGContextSetRGBStrokeColor(ctx, 0, 0, 0, 1);
// 4. 绘制路径
CGContextStrokePath(ctx);
}
|
使用 CGContextRef 创建路径后将清空图形上下文,如果我们想保存路径来复用,可以使用Quartz提供的CGPath函数集合来创建可复用的路径对象。
1
2
3
4
5
6
7
8
9
10
11
12
13
14
15
16
17
18
19
20
21
| // 1. 获取图形上下文
CGContextRef ctx = UIGraphicsGetCurrentContext();
// 2. 创建路径
CGMutablePathRef path = CGPathCreateMutable();
float radius = MIN(self.bounds.size.width, self.bounds.size.height) * 0.5 - 4;
CGPathAddArc(path, NULL, self.frame.size.width/2, self.frame.size.height/2, radius, 0, M_PI*2, 1);
//将路径添加到上下文
CGContextAddPath(ctx, path);
// 3. 设置绘制参数
CGContextSetLineWidth(ctx, 4);
CGContextSetRGBStrokeColor(ctx, 0, 0, 0, 1);
// 4. 绘制路径
CGContextStrokePath(ctx);
// 5. 释放路径
CGPathRelease(path);
|
使用UIBezierPath
UIBezierPath存在于UIKit中,是对路径绘制的封装,和CGContextRef类似,优点是更面向对象,我们可以像操作普通对象一样对其进行操作。
1
2
3
4
5
6
7
| - (void)drawRect:(CGRect)rect {
CGFloat radius = MIN(self.bounds.size.width, self.bounds.size.height) * 0.5 - 4;
UIBezierPath *path = [UIBezierPath bezierPathWithArcCenter:CGPointMake(self.frame.size.width/2, self.frame.size.height/2) radius:radius startAngle:0 endAngle:M_PI*2 clockwise:1];
path.lineWidth = 4;
[[UIColor blueColor] setStroke];
[path stroke];
}
|
使用Core Graphics绘制图片
Core Graphics 不仅可以绘制图形,还可以绘制图片
1
2
3
4
5
6
7
8
9
10
11
12
13
14
15
16
| - (void)drawImage {
// 1.开启上下文
UIGraphicsBeginImageContextWithOptions(self.dogImageView.bounds.size, NO, [UIScreen mainScreen].scale);
// 2.取得当前的上下文
CGContextRef ctx = UIGraphicsGetCurrentContext();
// 3.设置上下文
CGContextSetFillColorWithColor(ctx, [UIColor orangeColor].CGColor);
CGContextFillRect(ctx, self.dogImageView.bounds);
// 4.获取图片
self.dogImageView.image = UIGraphicsGetImageFromCurrentImageContext();
// 5.关闭上下文
UIGraphicsEndImageContext();
}
|
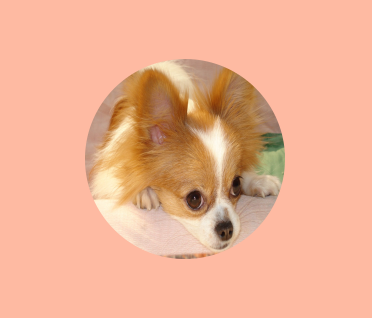
在开发中我们经常会有圆角图片的需求,我们也可以用Core Graphics来绘制圆角图片:
1
2
3
4
5
6
7
8
9
10
11
12
13
14
15
16
17
18
19
| - (void)circleImage {
// 1.开启上下文
UIGraphicsBeginImageContextWithOptions(self.dogImageView.bounds.size, NO, [UIScreen mainScreen].scale);
// 2.取得当前的上下文
CGContextRef ctx = UIGraphicsGetCurrentContext();
// 3.添加路径
CGFloat radius = self.dogImageView.frame.size.width / 2;
CGContextAddArc(ctx, self.dogImageView.bounds.size.width/2, self.dogImageView.bounds.size.height/2, radius, 0, M_PI*2, 1);
CGContextClip(ctx);
// 4.绘制图片
[self.dogImageView.image drawInRect:self.dogImageView.bounds];
self.dogImageView.image = UIGraphicsGetImageFromCurrentImageContext();
// 5.关闭上下文
UIGraphicsEndImageContext();
}
|