我们写的应用程序往往都不是静态的,因为它们需要适应用户的需求以及为执行各种任务而改变状态。一个好的动画清晰地向我们解释了,这些状态变化时界面正在发生什么。在了解了动画背后的基本原理后,你会发现原来实现一个动画并不那么困难。
起步
在开始写第一个动画之前,有必要了解一下 Core Animation 。
从字面上来理解,大部分人会以为它是只是用来做动画的,但实际上它是从一个叫做 Layer Kit 这么一个不怎么和动画有关的名字演变而来,所以做动画这只是 Core Animation 特性的冰山一角。Apple 官网是这么解释 Core Animation 的:
Core Animation is a graphics rendering and animation infrastructure available on both iOS and OS X that you use to animate the views and other visual elements of your app.
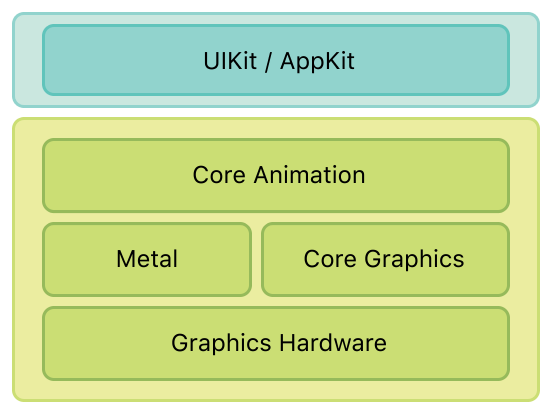
核心动画是一iOS和Mac OS平台上负责图形渲染和动画的基础框架。它并不是绘图系统本身,它是一个基础设施,用于在硬件中合成和操纵应用程序的内容。这个基础设施的核心是图层对象(CALayer),你可以使用它来管理和操纵你的内容。
它的职责就是尽可能快地组合屏幕上不同的可视内容,这个内容是被分解成独立的图层,存储在一个叫做图层树的体系之中。于是这个树形成了UIKit以及在iOS应用程序当中你所能在屏幕上看见的一切的基础。
Core Animation位于AppKit和UIKit下,并且与Cocoa和Cocoa Touch的视图工作流紧密集成。
使用 Core Animation 做动画,我们只需要设置一些简单的动画参数(例如起点和终点)然后告诉它开始动画即可,其他的工作Core Animation 都会为我们搞定。而所有这些动画产生作用的地方就是 CALayer 。
使用 Core Animation 创建的大部分动画都涉及修改Layer的属性。 像视图一样,图层对象也具有bounds,position,opacity等属性,对于大多数这些属性,更改属性的值将会创建一个隐式动画,从而使图层从旧值动画到新值。在我们需要对动画行为进行更多控制的情况下,可以显式地为这些属性设置动画。不过有一点需要说明的是,当把动画添加到一个 layer 时,是不直接修改它的属性的。
Core Animation 维护了三个平行layer层次结构:model layer tree(模型层树)、presentation layer tree(表示层树)和 rendering tree(渲染树)。模型层树反映了我们能直接看到的 layers 的状态,表示层树则是动画正在表现的值的近似。
所以当我们在 view 上增加一个渐出动画。如果在动画中的任意时刻,查看 layer 的 opacity 值,你是得不到与屏幕内容对应的透明度的。你应该查看 presentation layer 的 opacity 值以获得正确的结果。
通过使用 [CALayer presentationLayer] 和 [CALayer modelLayer],你可以在两个 layer 之间轻松切换。
开始动画吧
基础动画(CABasicAnimation)

像上图中通过修改坐标值来进行动画是比较常见和简单的。使用 CABasicAnimation,我们可以如下实现这个动画:
1 | CABasicAnimation *carAnimation = [CABasicAnimation animationWithKeyPath:@"position.x"]; |
在这里,我使用animationWithKeyPath:来创建 CABasicAnimation 对象,这说明动画会改变 layer 的x-position,这是 Core Animation 一个非常方便的特性,完整的 keyPath 列表可以看这里
然而,当我们运行该代码时,我们会发现当汽车在完成动画后马上回到了初始位置。这是因为在默认情况下,动画不会在超出其持续时间后还修改 presentation layer。实际上,在结束时它会被彻底移除。一旦动画被移除,presentation layer 将回到 model layer 的值,并且因为我们从未修改该 layer 的 position 属性,所以我们的汽车将重新出现在它开始的地方。
我们有两种方法来解决这个问题:
第一种方法是直接在 model layer 上更新属性。这是个人比较推荐的的做法。
一旦动画完成并且从 layer 中移除,presentation layer 将回到 model layer 设置的值,而这个值恰好与动画最后一个步骤相匹配。
1 | CABasicAnimation *carAnimation = [CABasicAnimation animationWithKeyPath:@"position.x"]; |
第二张方式是通过设置动画的 fillMode 属性为 kCAFillModeForward 以留在最终状态,并设置 removedOnCompletion 为 NO 以防止它被自动移除:
1 | CABasicAnimation *carAnimation = [CABasicAnimation animationWithKeyPath:@"position.x"]; |
如果将已完成的动画保持在 layer 上时,会造成额外的开销,因为渲染器会去进行额外的绘画工作。
实际上我们创建的动画对象在被添加到 layer 时立刻就复制了一份。这个特性在多个 view 中重用动画时这非常有用。比方说我们想要第二辆汽车在第一辆汽车启动不久后也开始启动:
1 | CABasicAnimation *carAnimation = [CABasicAnimation animationWithKeyPath:@"position.x"]; |
正是由于 addAnimation:时,carAnimation 被复制了,所以当我们设置动画的 beginTime 为未来1.5时,并没用影响到 carLayer,只有 carLayer2 受到了影响。
关键帧动画(CAKeyframeAnimation)
通常情况下,我们使用 CABasicAnimation 就可以创建一些简单的动画,例如上面例子中的小汽车的移动。现在我们可以使用 CAKeyframeAnimation 来实现更复杂的动画。
关键帧(keyframe)使我们能够定义动画中任意的一个点,然后让 Core Animation 填充所谓的中间帧。

使用 CAKeyframeAnimation来制作上面的动画非常简单:
1 | CAKeyframeAnimation *animation = [CAKeyframeAnimation animationWithKeyPath:@"transform.scale"]; |
values 数组定义了关键帧的位置。
设置 keyTimes 属性让我们能够指定关键帧动画发生的时间。它们被指定为关键帧动画总持续时间的一个分数。
在关键帧动画中使用路径
向上面那样将动画一些关键帧存储到 values数组中,在实现一个路径复杂的动画时,并不是一个好的选择,CAKeyframeAnimation 为我们提供了更加便利的 path 属性作为代替。
先让我们来实现一个外星飞船绕着地球做圆周运动的动画:
1 | CAKeyframeAnimation * animation = [CAKeyframeAnimation animationWithKeyPath:@"position"]; |
这里我使用 UIBezierPath 创建一个圆形的 CGPath 作为我们的关键帧动画的 path。然后动画就会按我们的预期那样运行了。这里有一个比较重要的属性: rotationMode。设置 rotationMode 属性为 kCAAnimationRotateAuto 确保飞船沿着路径旋转。如果我们不设置该属 那动画会是什么样的呢。
这样就看出了差别吧。飞船旋转的动作系统自动帮我们做好了,当然我们可以使用 CAAnimationGroup 自己去实现。
动画组(CAAnimationGroup)
对于某些复杂的效果,可能需要同时为多个属性进行动画,这时就可以使用 CAAnimationGroup 来组合多个动画了。